Netgear Extender Setup
Through increasing Wi-Fi coverage in places with weak signals, a Netgear extender setup lets you use your current network’s range. It connects wirelessly to your router by plugging into a power outlet and is simple to set up. Its small size makes it perfect for use in homes or offices. It improves your online experience by providing smooth connectivity for products like laptops, smartphones, and smart home appliances.
Requirements For Netgear WiFi Extender Setup
In order to configure a Netgear WiFi extender setup, the following are usually required:
- Make sure you have the extender model that you want to install.
- To access the configuration interface of the extender, use a tablet, laptop, or smartphone.
- The password and network name (SSID) of your existing Wi-Fi network are required.
- An adjacent power outlet where the extender can be plugged in.
- In certain configurations, the extender may need to be initially configured by connecting it to your router via an Ethernet connection.
- For the purpose of downloading any updates required throughout the Netgear wifi extender setup procedure, make sure your internet connection is steady.
Issues Facing For Netgear Wireless Extender Setup
When configuring a Netgear wireless extender, a number of problems could occur.
- Absence of LED Lights: Make sure the extender is correctly plugged into a functioning power outlet if it isn’t turning on. If required, try utilising a different power adaptor or outlet.
- Can’t Get into the Extender Network: Verify that you are in the Wi-Fi signal range of the extender. Verify that the password and SSID you entered are accurate. Try connecting once more after resetting the extender.
- Not Able to View the Netgear wifi extender Setup Page Try using the IP address of the extender if the default web address isn’t working for you to access the Netgear extender setup page.
- Configuration Wizard Freezing or Not Answering at All: To restart the Netgear extender setup wizard, close and reopen the web browser. Try use a different device or browser if the problem still exists.
- Firmware upgrade Failed: Reset the extender and try updating the firmware once more.
- Weak Signal or Dead Zones: Move the extender closer to your router or to a more central area if you’re having problems with either of these issues.
- Compatibility Issues: Verify that your router and network configurations are compatible with your extender.
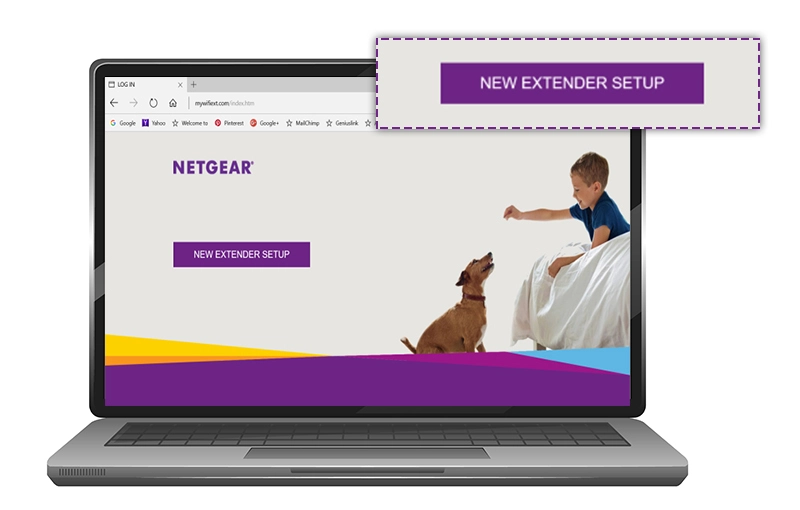
How To Setup Netgear WiFi Extender Using Web Address?
Use these instructions to configure a Netgear WiFi extender via a web address:
- Link the devices.
- Enter your Netgear extender’s default web address in your browser’s address bar.
- “http://mywifiext.net” and “http://192.168.1.250” are examples of common addresses.
- Hit the Enter key.
- This should take you to your extender’s login page.
- Enter the password and username if prompted.
- Both are normally set to “admin” unless you have already modified them.
- You’ll probably be walked through a setup wizard after logging in.
- If necessary, you can further adjust configurations using the web interface of the extender, including Wi-Fi network names, passwords, security settings, and more.
- If need, reposition the extender to provide better coverage.
- To choose the best spot with the strongest signal, use the extender’s LED indicators.
How Do You Setup A Netgear WiFi Extender Using IP Address?
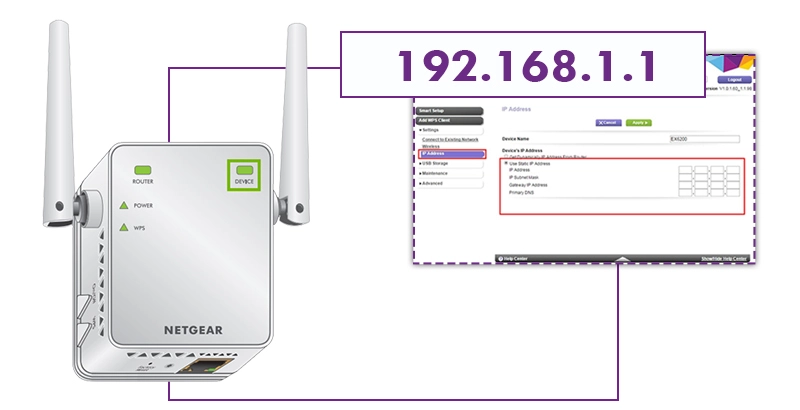
- Pass in the IP address of the extender
- Usually, it looks something like “192.168.1.1”.
- Open your device’s web browser.
- In the browser’s address field, insert the IP address of the extender and hit Enter.
- The netgear extender login page will appear.
- Enter the password and username
Netgear Range Extender Setup via WPS Method
Using WPS (Wi-Fi Protected Setup), Netgear range extender setup is quick and easy.
How To Setup A Wireless Extender Netgear:
- Make sure the extender is inside your router’s range before plugging it in.
- WPS knob on the extender should be pushed.
- WPS mode is activated in this way.
- After then, a connection will be made between the router and extender.
- The LED lights on the extender will show that the connection to the router was successful.
- For best coverage, move the extender if necessary to a different area.
- Now, devices can join the expanded wifi extender setup Netgear network by utilising your router’s SSID and password.
- Convenient and devoid of manual configuration is this way.
- Netgear wifi extender setup without WPS can be done through the app.
How To Setup Netgear Extender Using Ethernet Cable?
Using an Ethernet cable to Netgear setup extender offers a direct, reliable connection for initial setting. This is how you do it:
Troubleshoot Issue Netgear WiFi Range Extender Setup
In order to identify and fix the problem, troubleshooting a Netgear WiFi range extender setup may require multiple steps.
- Location: Keep it away from impediments or interference-prone regions like metal items, thick walls, or electrical appliances.
- Power Cycle: Switch off the range extender and your primary router. After a minute, wait and switch them back on. Rebooting the device could sometimes fix connectivity problems.
- Factory Reset: Take into consideration doing a factory reset if the extender isn’t working properly after you’ve previously configured it. By doing this, you can reset the extender to its original configuration and start over.
- Appropriate Configuration: Pay close attention to the Netgear extender setup guidelines. During the Netgear wifi extender setup process, make sure you’re connecting to the correct Netgear network extender setup and that the password is being entered correctly.
- WiFi Channels: Use an analyzer tool to see if nearby WiFi networks are interfering with your signal. Try switching to a less crowded WiFi channel on both your primary router and the extender if interference is detected.
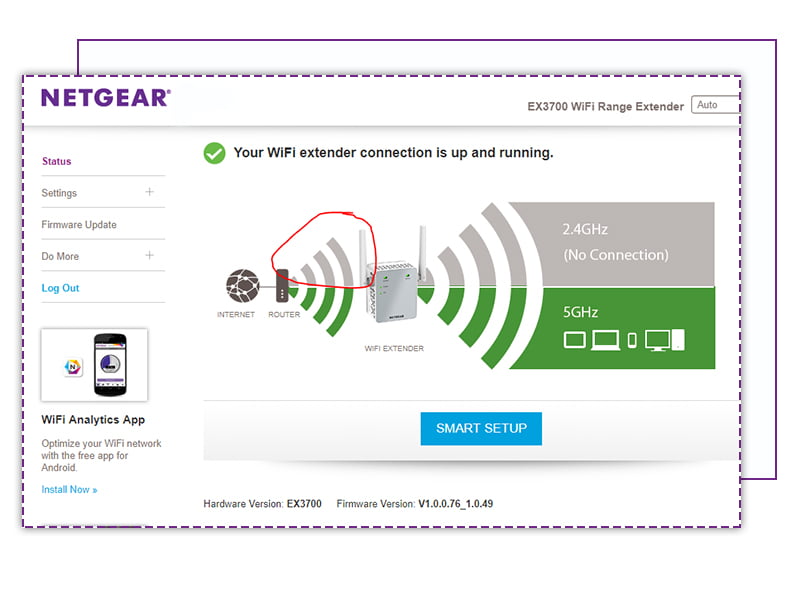
- Signal Strength: This can be accomplished by utilising the Netgear Genie software or by looking at the LED indications on the extender.
- Make sure the range extender’s SSID (WiFi network name) and password correspond to those on your primary router. Network configuration consistency is essential for uninterrupted connectivity.
- Security Configuration: Make sure to verify the security configurations on both the primary router and the range extender. Verify that they are using the same password and encryption type (WPA2-PSK, for example).
Netgear New Extender Setup With Existing Wi-Fi Network
Can’t Access The Netgear Wireless Extender Setup Page?
Try the following actions if you can’t get to the Netgear wireless extender setup configuration page:
- Verify that your device is correctly linked to the network of the extender (NETGEAR_EXT) by checking the connection.
- To be sure there are no compatibility problems, try viewing the Netgear wifi extender setup page with a different browser or device.
- Verify the IP address your device is receiving from the extender by checking its address. You could attempt manually allocating an IP address inside the subnet of the extender.
- Try resetting the extender from scratch after doing a factory reset if all else fails.
How To Setup Guest Network On Netgear WiFi Extender?
- Launch a browser
- In the address box, type “http://mywifiext.net”.
- Enter your admin credentials (password for password, admin for username by default).
- In the extender’s settings menu, look for the “Guest Network” or “Guest WiFi” option.
- To enable the guest network, toggle the option.
- Choose a password and a name (SSID) for your guest network. You can choose change other configurations, such as access time limits and network security.
- To save your edits, click the “Save” or “Apply” button.